SWIRLING LEAVES
BLANKET
My sister wanted something special
for her friend’s to-be grandchild, and that got me started on yet another
lovely new journey – to either find just that perfect pattern
or design one myself. Creative juices flowing, hook and yarn in hand, I
started off with ideas.. while the internet was also doing it’s thing.. giving
me ideas and free patterns and this lovely Swirling leaves blanket caught my
eye.
Thank you for joining me.
In case you have just joined me, know that you can access all of my earlier creations by checking under ‘categories’ on the right hand side of this blog under “Labels”. Then, for your convenience, follow me here or on Facebook, You Tube, Pinterest, Twitter or Instagram. Check out all my social media handles at the bottom of this blog
Oh, and may I add that the fastest way to find any of my blogs is via Pinterest.
Do remember to add my blog URL when you make and show off your creation. Cheers. Enjoy
The designer has done a superb job in giving us not one, not two, but ten options of making this pattern.. all the way from a “lovey” size at 12” x 12” to a “king” sized one at 104” x 96” !!
The stitch pattern is the same, with differences worked in for counts that the designer has taken the trouble of giving us :)
Pattern link for the original Swirling
Leaves Blanket http://www.cre8tioncrochet.com/2014/07/swirling-leaves-blanket/
The pattern sheet has a photo tutorial,
and this is the inspirational photograph..
10-in-1 :)
The stitch is also a lovely one – cute, quick and a really simple
repeat.
The yarn and my loose hold (i.e tension) is also making it so soft
and fluffy that oooh, it’s lovely! :)
One point I’d reiterate and agree with the designer who says in
her notes section that we should keep a count on our stitches every few rows to
ensure we don’t drop a cluster .. DO count.. else, like I did you too may need
a ‘rip rip’ frogging .. and none of us like that now, do we ?
I make notes for all the patterns I make, as many-a-times,
the pattern is so good, but due to the difference in my yarn and hook, I end up
with a slightly ‘different’ end project. Then I realized that many of us
(Indians, who are using similar local yarns) have the same drawback.. so here are
my inputs with our locally available Indian yarn.. I’ve put the “Indian” into
the pattern
Materials used : Vardhaman baby soft 4-ply acrylic yarn (~ 225 gms / 10.2 skeins) with a 4.5 mm (US 7) crochet hook
Size : Stroller (32” x 36”)
Gauge : 3 cluster sts across x ~ 2 rows high = 2”
Skill level : Easy, advanced beginner.
Need to know how to do ch, sc, dc and dc 4-tog.
Stitches used :
Starting slip knot : Here’s how you start with a slip knot. https://youtu.be/lJcqsVcs8cw
Starting slip knot 1 or the Sloppy Slip knot : This is a neat new way to start your work without a slip knot. https://youtu.be/YfC7KmGpifs
What is a chain stitch ? Here is an easy video tutorial https://www.youtube.com/watch?v=pXx5ukBjKkY
How to hold your yarn in crochet : https://youtu.be/FwOlCbGdbqY
Foundation Single Crochet : fsc : To refresh your skill on the fsc, please view this video https://youtu.be/mcT85fwh4mA
Double Crochet : dc : yo, insert hk into st ; yo (3 lps on hk); [yo, draw through 2 lps] twice. One dc made. Check out the video at https://youtu.be/xdnjB27zpYo
Chainless start for Double Crochet : I dislike the ch-2 / ch – 3 start, and this is what I do to start my row of dc.
Check out the video at https://youtu.be/wskv3iTjRx0
cl st : A cluster stitch with is a 4 dc-tog.
The designer uses the 4 dc-tog as a wrapped stitch, where in you wrap (or go around) the previous dc, such that instead of your 4 dc-tog coming up at you like a regular triangle, this stitch is an angled triangle, so the stitches all look diagonal or angled.
And then just for a difference, and for fun, the designer has thrown in another twist, where she has split the 4 dc-tog stitch
How do we work the cl st for this pattern :
dc, ch 2, sk 2 sts, [4 dc-tog in such a way that you do 3 dc-tog in the previous dc, and the last dc (of the 4 dc-tog) in the st after the 2 sk sts]. Make sense?
I've made a chart and you can also take a look at this lovely video link provided by designer at http://newstitchaday.com/how-to-crochet-the-connected-spiral-stitch/
Note that in the video above, the cluster /connected spiral stitch shown has ch 3, whereas designer has used ch-2, but the idea is the same.
I thought I’d chart what I’ve done with the pattern, as the photos (which the designer has provided) do not really show the lovely stitch .. for what I’ve done J
Key / Legend for chart at the end of the blog
Pattern instructions :
I was a little confused with the pattern stitch so here is what I did. Please visit the link of the designer first, and if you are confused, then come back here and see if my notes help.
I’d like to break down the lovely cluster st (cl-st) into two parts here :
one for the 1st fsc row and one for all other rows.
The cluster st is a 4 dc-tog, here the designer has split the st into 3 dc-tog in one st and then 1 dc in a st (2 sts away) and then putting all these 4 separated sts as 1 dc 4-tog.
1st fsc row cl-st : (We start all rows with a 2 dc, and the 1st cl-st will be in the 2nd of these two dc’s, which will be called the ‘previous’ dc)
So start with 2 dc, then 2 ch, the 1st 3 dc (of our cl-st) go into the previous dc, then sk 2 fsc, and then the last dc (of our cl-st) is in the next fsc).
So our cl-st (4 dc-tog) is spread over 4 sts.
cl-st for all other rows : (Remember we start all rows with a 2 dc, and the 1st cl-st will be in the 2nd of these two dc’s, which will be called the ‘previous’ dc)
So start with 2 dc, then 2 ch, the 1st 3 dc (of our cl-st) go into the previous dc, then the last dc (of our cl-st) is in the next ch-2).
So our cl-st (4 dc-tog) here will be moving in the opposite direction from the one in the earlier row – which is why they look like leaves J
Row 1 : I started with 121 fsc.
Turn.
Row 2 : 2 dc in 1st fsc ;
ch 2, sk 2 fsc, cl-st in next previous dc (i.e dc just made in 1st fsc) ;
*ch 2, sk 2 fsc, cl-st in the previous dc (i.e the dc after the 2 sk sts)* ;
rep from *to* till end ;
ch 2, dc in last fsc.
Turn. (40 cl-sts) (Refer to 1st fsc row cl-st )
Row 3 : 2 dc in 1st dc ;
ch 2, cl-st in such a way that dc 3-tog in the previous dc, and the last dc of the cl-st in the 1st ch-2 sp ;
*ch 2, cl-st in the previous dc and next ch-2 sp* ;
rep from *to* till end ;
ch 2, dc in the last dc.
Turn. (40 cl-sts) (Refer to cl-st for all other rows )
Rep Row 3 (per pattern it reads Rows 4-46, but I achieved a length
of 38”with a total of 40 rows, from start)
And just to show you how the ‘leaves’ turn in opposite
directions, here’s the next row
Next row : sc in the 1st dc ;
*2 sc in ch-2 sp, sc on top of the cl-st* ;
rep from *to* till last dc ;
check that you have 121 sc and then turn and do one more row of sc’s on top of this row ;
then you will continue down the sides of your blanket till the 1st fsc row ;
work a row of sc on that 1st fsc row and then up the other side till you reach the top corner of your blanket.
Finishing : Designer has suggested 2 rows of sc and then one row of crab stitch or reverse sc to complete.
Crab stitch / Reverse single crochet : (Reverse sc) : This is your regular single crochet st, but done in
reverse. So instead of moving ‘clockwise’ as we regularly work, you
move anti-clockwise or counter clockwise, and you’ll achieve a
slightly ‘bumpy’ single crochet, which is your reverse sc.
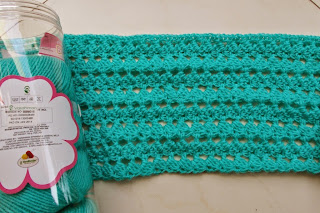
See how the 'leaves' look - so in each row, we make the
has the cl-st in such a way that it looks like the pattern is moving in the
opposite direction, so the pattern looks like leaves. Makes sense?? well,
do it.. and see how lovely this is!
the edging reverse sc / crab stitch
the yarn - Vardhaman baby soft Color shade BBM015
Key or Legend for chart symbols
And that’s done.. yet another project brilliantly executed !
Enjoyed this ?? I sure did.. Come back right here for more freebie patterns
Remember to share this blog post when you share your photos with me on Facebook. I’d love to feature your photos on my FB page. Cheers.
If you're visiting me here for the first time, and have liked the experience, do add me to your mailing list (for your convenience) , and all my future free patterns will come straight to your mail box.
I’d appreciate if you could credit my blog (and link the original pattern link) when you make your own creation. Thanks.
Check out my awesome pins on Pinterest at https://in.pinterest.com/shyamanivas/
OR just my free patterns at https://in.pinterest.com/shyamanivas/free-patterns-made-by-me/
Join me on YouTube at https://www.youtube.com/channel/UCU79wcXXTaKaKg3qXgVN8Ag
And and on my Facebook page at https://www.facebook.com/pages/Sweet-Nothings-Crochet/248919438644360 for more patterns.
Do follow me on Twitter https://twitter.com/ShyamaNivas
Do follow me on Instagram https://www.instagram.com/sweetnothingscrochet/
Do also visit me at http://www.craftsy.com/user/2573073/pattern-store?_ct=cx-buvjdql&_ctp=my-pattern-store,manage
Have a great day and see you soon.
For some more blanket and granny square projects, check the links below


