

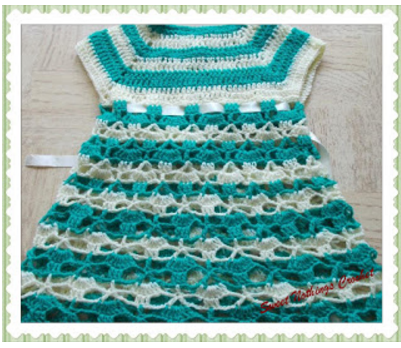
HAADAASHA’s SHELLED DRESS
A really beautiful dress that has yet again made it from my “to-do” list to the “yaay done it” list .. well, almost done it! This dress has been specially chosen for a lovely little girl named Haadaasha. Along with this cute dress, we’ll also learn how to make a lovely little rose.
Thank you for joining me.
In case you have just joined me, know that you can access all of my earlier creations by checking under ‘categories’ on the right hand side of this blog under “Labels”. Then, for your convenience, follow me here or on Facebook, You Tube, Pinterest, Twitter or Instagram. Check out all my social media handles at the bottom of this blog
Oh, and may I add that the fastest way to find any of my blogs is via Pinterest.
All my blogs can be printed. Find the printer friendly (green) link on the right side of this blog. You can also hit Control P (or Command P for Mac) on your keyboard, and the blog will go directly to the connected printer.
Remember that you only print if absolutely essential. Save paper – Save Our Earth.
Do remember to add my blog URL when you make and show off your creation.
Just copy the link on the search bar above - that's the blog URL.
To purchase this or similar yarn online, click the highlighted links below to buy your yarns online via Amazon. While you will still pay the same, I may get paid by Amazon as well.
This is a free blog - so do pay it forward for me. Cheers.
Do check my long Pinterest “to-do” list for little girl’s dresses at https://in.pinterest.com/shyamanivas/girls-dresses-to-make/
Thanks for joining me once again as we work on and discover this new pattern together.
Materials used : Crochet cotton (from Australia) with a 3.5 mm crochet hook ; embroidery needle
For Indians : You could use Anchor , Red rose , 4-ply knitting cotton , or unbranded knitting cotton or White Rose or bamboo knitting cotton , Milk cotton ; Silk yarns as well as Vardhaman acrylic yarns ; Baby soft acrylic yarn , Ganga Spectrum as well
General yarn info : The yarn used today is not specific to this pattern.
You can use any yarn with a suitable hook to make this project to any size.
International yarns : Among the international yarns I have used in this thickness, I’d suggest Aunt Lydia Cotton 10, Aunt Lydia Bamboo-Viscose 10, DMC Petra, Sullivans knitting cotton (Australia), Milford Soft, Hilaza Rustica Eclat , Alize cotton yarn and Alize bamboo yarn , Lily Sugar n' Cream cotton yarn, Caron Simply Soft , Bernat Softee chunky.

Size made : Chest : 20” ; Length 18.5”
You can make this to any size. Size just given for yarn estimation reference.
Difficulty level : Intermediate to advanced level
Stitches used :
How to hold your yarn in crochet : https://youtu.be/FwOlCbGdbqY
Starting slip knot : https://youtu.be/lJcqsVcs8cw
Starting slip knot 1 or the Sloppy Slip knot : https://youtu.be/YfC7KmGpifs
What is a slip stitch : https://youtu.be/weB3QNbA8Iw
What is a chain stitch ? https://youtu.be/pXx5ukBjKkY
Foundation Single Crochet : fsc : https://youtu.be/mcT85fwh4mA
Double Crochet : dc : yo, insert hk into st ; yo (3 lps on hk);
[yo, draw through 2 lps] twice. One dc made.
Check out the video at https://youtu.be/xdnjB27zpYo
Chainless start for Double Crochet : I dislike the ch-2 / ch – 3 start, and this is what I do to start my row of dc.
Check out the video at https://youtu.be/wskv3iTjRx0
Whipstitch to join : https://youtu.be/wZ-9LNzftMA
Invisible join : https://youtu.be/a6XZQ6VzJFM
Single crochet to join : https://youtu.be/6FXoW_47_dI
Here is a sizing chart for general neck sizing
Here is a sizing chart for general body sizing
Abbreviations used :
ch : Chain sp(s) : Space(s)
dc : Double crochet hk : Hook
st(s) : Stitch(es)
sk : Skip sp : space
rep : repeat
fsc : Foundation single crochet
Instructions
Please note that I start all my rows with a ch 1, turning chain for ease.
Please check the top of this blog for easy video tutorials on all stitches used in today's pattern.
Please read through all my notes before you pick up your hook, so you know just where we're heading in our pattern.
In my patterns I work with the principle of stitch count and body measurement.
This means that you need to work the stitch count in pattern, till you get the measurement (length and/or width) that you need for your project.
Inspired by the charts (but no written pattern) at this link http://club.osinka.r, here are my notes as I make my project
So before we set off on our new creative journey, let’s take a quick look at what we’re creating here today.
There are four parts to our shelled dress project today.
We start with the yoke, and work from the waist up to the shoulder, and then we come back down to this start row and work down for the skirt.
Now the yoke is worked in one piece, and we work back and forth so that we work a 4 dc placket at the back for closure.
We then come back to the start fsc row and work the skirt from this row, in rounds.
The top of our yoke is a straight line (so no decreases and worries) and there’s a neat scalloped strap for the shoulders.
For the final bit, we will make a cute rose to embellish this already cute dress. so let’s get started.
Now the big question.. how do you calculate how many stitches to start?
Well, for this pattern, we’ve got it super easy – we just work the measure for the round waist – and working with the pattern repeat for the waist, you work that many fsc stitches for your start row.
For the button placket, do remember to add 4 sts to the start row count.
Part I : Yoke
Start with fsc in multiples of 5 + 4 (for placket). Turn
Row 1 : dc in the 1st 2 dc ;
*ch 2, sk next 2 fsc, dc in next 3 fsc* ;
rep from *to* till last 2 fsc ;
dc in last 2 fsc. Turn.
Row 2 : dc in the 1st 2 dc ;
2 dc in the ch-2 sp ;
*ch 2, sk next 3 dc ; 2 dc in the ch-2 sp*;
rep from *to* till last 2 dc ;
dc in last 2 dc. Turn.
Row 3 : dc in the 1st 2 dc ;
*ch 2, sk next 3 dc, 3 dc in the next ch-2 sp* ;
rep from *to* till last 2 dc ;
dc in last 2 dc. Turn.

Rep Rows 2 and 3 , ending with a Row 3 till you reach just under the armhole, and then we’ll do a quick decrease.
So the next question is how does one calculate how high to go with the yoke?
Well, I usually take the easy way out and use a well-fitting dress of the person for whom this is intended as a marker,
but the thumb rule is also that the yoke is just about 1/3rd of the whole dress length, for younger kids (i.e till Age 1).
For older kids, the yoke should come just under the armhole, so that the skirt portion of the dress starts just under the armhole.
And though this chart is not in English, with the above hint(s), you will get a better handle on all of this.. else, trial and error.. always the best teacher, I'd say.


So our decrease row will divide the front and back(s).
For this, we first need to decide where our armholes come in – so fold your strip / work in half, in such a way that the 2 dc ends meet (which will make that the back - See photo below) and you have an even continuous front portion, and two back halves.
Now you can mark the two sides for the armhole and work the decrease row for that section (with marker) only.
From this row on, we will be working the front and back sections separately.

Decrease Row : dc in the 1st 2 dc ;
2 dc in the ch-2 sp
*ch 2, sk next 3 dc ; 2 dc in the ch-2 sp*;
rep from *to* till the corner marker ;
sk the last 3 dc before the marker. Turn.
Rep Rows 3 and 2 till your project reaches the level you wish for the neckline.
The neckline in this dress will be a straight one – so pretty simple, right?
Remember that there is a small strap that we need to make.
Instructions for this after the skirt / body of dress.
Part 2 : Body of dress
So for this portion of the dress, we go back down to the first fsc row we’ve started with, and keeping the yoke of the dress facing you, we will work the skirt portion of the dress.
We work the body or skirt portion of the dress in rounds.
So remember to join with a sl-st at the end of the round.
When working with the lower skirt portion, you could either overlap the 4 dc border / placket (for older children) or you work in a loop along one edge and add the button on the other placket edge.
If overlapping, do remember that you need to do that before you work the bottom skirt bit (i.e overlap it and then work the stitches over both plackets.
The designer has used three colours for her skirt portion – each shell (two rounds of pattern) making one colour strip.
So while I will indicate where you need to change, you could do this beauty in one colour as well.
Our stitch count is in multiples of 6.
So for this portion, we’re going to run a row of ch-6’s (or ch-6 spaces) all around going through all the ch-2 sps of that first fsc row.
To start, let’s re-attach the yarn at the centre back of the dress – on the first fsc row.
Round 1 : *ch 6, sk next 3 dc, sc in the next ch-2 sp* ;
rep from *to* all around ;
and join with a sl-st to the 1st st.
Round 2 : sl-st into the 1st ch-6 sp ;
sc in the same 1st ch-6 sp ;
(ch 1, dc) in the same ch-6 sp ;
rep (to) 3 times ;
*dc in the next ch-6 sp ;
rep (to) 4 times* ;
rep from *to* all around ;
and join with a sl-st to the 1st st.
Round 3 : sl-st into the 1st ch-1 sp ; sc in the same ch-1 sp ;
(ch 3, sc in the next 1st ch-1 sp) ;
rep (to) 2 times ;
*sc in the next ch-1 sp ;
rep (to) 3 times* ;
rep from *to* all around ;
and join with a sl-st to the 1st st.
Note : If changing colours, change now.
Round 4 : sk the 1st ch-3 sp and sl-st into the next ch-3 sp ;
dc in the same ch-3 sp ;
(ch 1, dc) in the same ch-3 sp ;
rep (to) 3 times ;
*sk next two ch-3 sps , dc in the next ch-3 sp ;
rep (to) 4 times* ;
rep from *to* all around ;
and join with a sl-st to the 1st st.
Round 5 : sl-st into the 1st ch-1 sp ;
sc in the same ch-1 sp ;
(ch 3, sc in the next 1st ch-1 sp) ;
rep (to) 2 times ;
*sc in the next ch-1 sp ;
rep (to) 3 times* ;
rep from *to* all around ;
and join with a sl-st to the 1st st.
Rounds 4 and 5 form one pattern repeat.
If changing colours, change after Round 5 for each colour repeat.
Rep Rounds 4 and 5 till length needed.

Notes : So here are a few ideas
If using multiple colours, instead of changing every pattern repeat, you could change every second pattern repeat – so you have two pattern rounds in each colour.
Secondly, I am pretty happy with the ‘flared’ shape as I’m also making this dress for a younger child, but if you want more of a flared shape, you could add a few (ch 1, dc) repeats in Round 4 (and then you will have to similarly increase the repeats in Round 5) and add to the flare in the lower part of the dress.
Note that if you do decide to increase the (ch 1, dc) pattern repeat, it must be in ODD numbers.
In this pattern we have a total of 5 dcs and 4 ch-1 sps, so you will need to increase that to 7 dcs with 6 ch-1 sps etc.
Great .. so off we go and complete our lovely dress.
Once done, fasten off and weave in all ends.
Then let’s go and show off this new creation on all the social networking pages – remember to tag me and add the blog url when you share it on social media. Thanks.

Part 3 : Shoulder strap : Make two
There is no chart or pattern for this.
So following the general shell-like pattern, I’ve worked this strap myself.
Basically, I’m going to work a fsc row and then work scallops on both sides – so we work scallops on one side of fsc, then go around and work scallops around the other side and as we’re doing the scallops, we’ll do it all around the neckline and armhole.
Start with as many fsc as you want for the length of your shoulder strap
How do you measure this length? Place the dress on the child or on top of that well-fitted dress I’ve mentioned before and calculate length for strap.
Row 1 : sc in the 1st fsc ;
*ch 5, sk next 4 fsc, sc in the next fsc* ;
rep *to* till end. Turn.
Row 2 : sc in the 1st sc , 7 dc in the 1st ch-5 sp ;
*sc in the next sc ;
7 dc in the next ch-5 sp* ;
rep *to* till end.
Turn. Fasten off and weave in ends.
Re-attach yarn onto the other side of this same fsc chain and Rep Rows 1 and 2 for the scalloped finish on the other side.
Make two such straps and attach them onto the top of the yoke (front to back).
Fasten off and weave in ends, attach your button and a lovely satin ribbon .. and Voila ! Yet another beautiful dress made for your young lady.

Back view
For the final “ta da ” moment, let’s make a cute rose embellishment.
Part 4 : Rose motif :
For our rose motif, we will first make a long lace, and then we will roll it into this gorgeous little rose flower. Here's a quick video to show you what we're going to do.
In case this video does not come on, please go to https://youtu.be/CBOnr0cIltw

Right then, let's start , shall we?
Start with a fsc in multiples of 3 + 1.
I started with 52 fsc.
Row 1 : dc in the 1st fsc ,
*sk next 2 fsc, [2 dc, ch 1, 2 dc] in the next fsc* ;
rep *to* till last fsc ;
dc in the last fsc. Turn.
Now for the next row, we’re going to make the frilly petal bits.
For this we will use the space between 2 sets of the “V” stitches.
Now this is not an actual space – but it is the ends of the 2 sts, and will hold the 8 dcs up like a fan.
Hopefully you’ve understood what I mean.. and will follow with the chart and photo below.


Row 2 : sc in the 1st dc ;
*8 dc in the next ch-1 sp ;
sk next 2 dc, sc in the next space* ;
rep *to* till last dc ;
sc in the last dc.
Fasten off, leaving about a 10-12” long tail to stitch up.
Now comes the best part. Putting this rose motif together from this lace.
Holding your rose lace strip with the wrong side facing you, start rolling your strip and sewing in the lower edges to hold the rose together.
Slowly but steadily you’ll see the beautiful flower emerge.


What I did was to check that I was able to figure out how to roll it neatly before I took out my needle and threaded in that long tail to sew it in.
Ta da.. isn’t this just beautiful ??
And of course, I needn’t add that the more delicate your yarn, the cuter, smaller and more delicate your rose.
So go ahead and make more roses.. not just for this lovely dress but a lovely bouquet for your home too.. I know you’re longing to do it too
In the photo below, the tops of each flower are in a contrast colour.. and what a difference that makes!

Enjoyed this ?? I sure did.. Come back right here for more freebie patterns
Remember to share this blog post when you share your photos with me on Facebook. I’d love to feature your photos on my FB page. Cheers.
If you're visiting me here for the first time, and have liked the experience, do add me to your mailing list (for your convenience) , and all my future free patterns will come straight to your mail box.
I’d appreciate if you could credit my blog (and link the original pattern link) when you make your own creation. Thanks.
Check out my awesome pins on Pinterest at https://in.pinterest.com/shyamanivas/
OR just my free patterns at https://in.pinterest.com/shyamanivas/free-patterns-made-by-me/
Join me on YouTube at https://youtube.com/shyamanivas
And on my Facebook page at https://www.facebook.com/Sweet-Nothings-Crochet/ for more patterns.
Do follow me on Twitter https://twitter.com/ShyamaNivas
Do follow me on Instagram https://www.instagram.com/sweetnothingscrochet/
Find me on Ravelry at ravelry.com/projects/shyamanivas/
Have a great day and see you soon.
I have a few girls dresses already made, and just in case you want a dekho at those free patterns … here you go


and here are a few skirt patterns that you can use your belt for..
Here are some of my tops
Here are some of my bolero / jacket / vest creations. Have fun with these free patterns too
Here is a list of my earlier miscellaneous home use projects. Enjoy