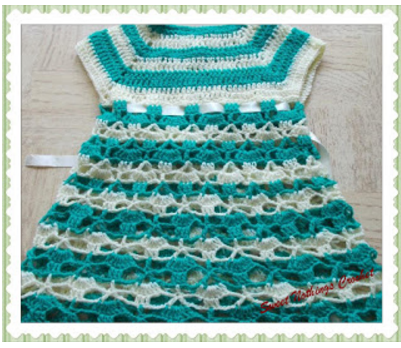
EXQUISITE SHELLED DRESS FOR GIRLS
( #Blogaday 09/365 )
This is a dress that my friend saw on her
Facebook page and said that I just had to make it for her granddaughter. It is a really simple shelled dress, and in
its simplicity lies the exquisiteness of this pattern.
The whole dress has shells, all the way from the
top to the bottom – how lovely is that?
As always, this pattern can be made to fit any
sized child. All you need to do is
ensure you have the stitch count, and work it to fit the size that you are
working with/for.
Please remember that
as usual, I have lots of ideas and tweaks thrown in, so do read through all my
wordsy explanations. After all, I am
taking the trouble of thinking all this through :)
And as we’re making requests, may I request you
to link my blog when you make your project. I feel horrid saying this, but there are many
who have used the patterns freely given here, and not given any credit to the
blog that has given them this pattern.
Come on guys.. it ain’t that much work to give credit and link the blog
now, is it?
It’s worse when someone says “taken this from
…(where ever they’ve taken the pattern from.. not just my blog I mean)” and not
taking the trouble of giving the proper link(s).
Thank you for joining me.
In case you have just joined me, know that you can access all of my earlier creations by checking under ‘categories’ on the right hand side of this blog under “Labels”. Then, for your convenience, follow me here or on Facebook, You Tube, Pinterest, Twitter or Instagram.
Check out all my social media handles at the bottom of this blog
Oh, and may I add that the fastest way to find any of my blogs is via Pinterest.
All my blogs can be printed. Find the printer friendly (green) link on the right side of this blog. You can also hit Control P (or Command P for Mac) on your keyboard, and the blog will go directly to the connected printer.
Remember that you only print if absolutely essential. Save paper – Save Our Earth.
Do remember to add my blog URL when you make and show off your creation.
Just copy the link on the search bar above - that's the blog URL.
To purchase this or similar yarn online, click the highlighted links below to buy your yarns online via Amazon. While you will still pay the same, I may get paid by Amazon as well.
This is a free blog - so do pay it forward for me. Cheers.
Thanks for joining me once again as we work on and discover this new pattern together.
General yarn info : The yarn used today is not specific to this pattern.
You can use any yarn with a suitable hook to make this project to any size.
International yarns : Among the international yarns I have used in this thickness, I’d suggest Aunt Lydia Cotton 10, Aunt Lydia Bamboo-Viscose 10, DMC Petra, Sullivans knitting cotton (Australia), Milford Soft, Hilaza Rustica Eclat , Alize cotton yarn and Alize bamboo yarn , Lily Sugar n' Cream cotton yarn, Caron Simply Soft , Bernat Softee chunky.
Size made :
For a 6 - 9 month old
Difficulty level
: Intermediate Skill level.
The stitches used in this pattern are simple and
the pattern is repetitive. However,
there is calculation involved, and there are decisions and judgments that you
will need to take/make.
Stitches used : Using U.S terminology
Double Crochet : dc : yo, insert hk into st ; yo (3 lps on hk);
[yo, draw through 2 lps] twice. One dc made.
Chainless start for Double Crochet : I dislike the ch-2 / ch – 3 start, and this is what I do to start my row of dc.
Here is a sizing chart for general neck sizing
Here is a sizing chart for general body sizing
Abbreviations used :
ch : Chain sp(s) : Space(s)
dc : Double crochet hk : Hook
st(s) : Stitch(es) sl-st : slip stitch
sk : Skip sp : space
rep : repeat
fsc : Foundation single crochet
Instructions
Please note that I start all my rows with a ch 1, turning chain for ease.
Please check the top of this blog for easy video tutorials on all stitches used in today's pattern.
Please read through all my notes before you pick up your hook, so you know just where we're heading in our pattern.
In my patterns I work with the principle of stitch count and body measurement.
This means that you need to work the stitch count in pattern, till you get the measurement (length and/or width) that you need for your project.
So before we set off on our new creative journey, let’s take a quick look at what we’re creating here today.
So before we set off on our new creative
journey, let’s take a quick look at what we’re creating here today.
Now there is a link for a set of sizing /
measurement charts depending on age of child and I’d suggest we use that as a
reference. I always suggest that if
you’re making this specifically for someone you know, try and get a well-fitted
dress / outfit of that child.
We start our dress from the chest and work two
halves of your yoke from chest to shoulders.
We will then come back to this first foundation round and re-attach yarn
for the lower skirt part of the dress.
As I’ve mentioned at the start, this pattern can
be made to fit any sized child.
Just get your stitch count right.
Part 1 : Yoke (Make 2)
We will make two yokes, and then join it
at the shoulders and sides.
May I
suggest that if you are working this pattern for a younger child, you keep the
yoke completely open along the back, keeping a fuller longer button placket,
for the ease of getting it onto & over the child. For older children, you can opt for a shorter
placket.
And right off the bat, here is a tweak.
Using this same pattern, you can have this dress
starting at the waist, and work the skirt pattern off the waist. You will get a completely different finish
and effect with this twist / tweak.
Remember though that you will need to work with measurement for Round
Waist and not Round Chest.. but you knew that already!
Start Row 1 : with fsc in multiples of 10 + 1 for
the Half Round Chest measure of the child you are making this for. Turn
Note : What is
round chest?
It is (a) either the part
that you are going to work the yoke up to ;
or (b) the largest portion of chest
under armhole.
Remember, if you are working this pattern to the
waist, you must check both chest and waist measurements and work to half
of the larger measure. This means that
if round chest is more than round waist, even if you are starting at round
waist, you will use half round chest measurement!
Note also that the Shell stitch decreases your
start chain length, so stop now and check that the Round Chest measure is still
correct.
Check again after the next row
as well, just to reduce ripping your work out.
Row 2 : sc in the 1st fsc ;
*ch 1, sk next 3 fsc, 3 dc in the next fsc ;
ch
2, 3 dc in the next fsc ;
ch 1, sk next 3 fsc, dc in the next fsc* ;
rep *to* till end. Turn.
We start with a Shell Stitch (or Shell St) which
is (3 dc ; ch 2, 3 dc all in the same ch-2 sp)
Row 3 : dc in the 1st sc ;
*sk the next ch-1 sp and dc, dc in the next dc ;
ch 1, sk next dc, Shell St in the next ch-2 sp ;
(ch 1, sk next dc, dc in the next dc) ;
[ch 1, sk next dc, dc in the next sc]* ;
rep *to* till end. Turn.
Now here’s where this pattern requires
calculation and gets a little bit complicated.
As per chart, you will have just this following row, before you divide
for armhole. So here’s what you need to
do
a) See
how many inches (work your gauge) from the start row till end of Row 2. Calculate how many more inches you will add
after you have worked Row 3
b) See
if you are OK with this height / length for the yoke, if YES, then continue on
with the pattern as written, if NO, read ( c )
c) If
you think that you want a longer yoke or are starting this pattern at the
waist, so obviously need more pattern rows to get to the armhole, then you will
just follow the pattern all the way till the armhole and then work the
decreases only when you get to the armhole.
So work your calculations and carry on with the
pattern.
Row 4 : dc in the 1st dc ;
*sk the next ch-1 sp and dc, dc in the next dc ;
ch 1, sk next dc, Shell St in the next ch-2 sp ;
(ch 1, sk next dc, dc in the next dc) ; rep (to)
once* ;
rep *to* till end. Turn.
Decide now where you need your armholes. Rep Row 4 till you reach the armhole
level and then we will work in a small decrease to shape the armhole.
For our armhole decrease, we will just reduce
one Shell st at each end. Now let’s look
at the 3 dc that we have worked just after the 1st dc and just
before the last Shell st. This is the
3-dc set that will mark the two ends of our armhole. We will use that centre dc of this 3-dc set
to mark the two ends. So go ahead and
place a marker in that centre dc.
Armhole Decrease Row : sl-st past the 1st Shell st and
into the marked dc ; dc in that marked dc ;
*sk the next ch-1 sp and dc, dc in the next dc ;
ch 1, sk next dc, Shell St in the next ch-2 sp ;
(ch 1, sk next dc, dc in the next dc) ; rep (to)
once* ;
rep *to* till the last marked dc ; ending with a
dc in that last marked dc. Turn.
With this one decrease, we’ve got a neat shape
to our armhole.
Continue Rep Row 4 till you reach the neck level.
Neckline Decrease Idea : For the neckline, we’re going to work a
decrease exactly as we did for the armhole. So first decide how wide and low
you want the neckline, and then find the two 3-dc sets on either side of the
Shell St. Place a marker in the centre dc of the 3-dc set and
work from the armhole to this marked dc and back for one side of the front,
till you reach the shoulders. Fasten off
and then re-attach your yarn at the 2nd marked dc to work the other
side of the front yoke till the shoulders.
Once you reach the shoulder, fasten off and
weave in ends.
You have now completed the front of your yoke.
For the back,
you will work the same pattern but remember that you will be splitting
the back for a button placket.
Now here’s what I usually do for the back. Depending on how many Shell st repeats you
have for the front, you will know just where your centre back is going to come
in.
If you are lucky and you have an uneven
number of Shell sts, then you will just choose the centre dc of the 3-dc set to
be the break-point for the button placket.
If you have an even number of Shell sts,
then you will need to split one Shell St.
This means that you will work half the Shell st
(i.e 3 dc) and then work a dc in the last dc.
This applies for both ends of the button placket.
Right ho, then.
Let’s get cracking and get this yoke done. We’ll meet back here soon to work on the
skirt of this lovely shelled dress.
Part 2 : Skirt of dress
For the skirt portion, we will work in
rounds. So what I’ve done is joined the
button placket of the yoke and then work the skirt portion continuously.
The stitch count for the skirt portion is in multiples of 10.
So before you go off, here’s an idea.
The yoke has a similar stitch count, so you will
be actually working in the same stitches as you have for the yoke.
However,
that will also mean that the dress is “A”-lined.
I was not happy with that, so I added a few
stitches before I started Round 1 and the pattern.
So what you too can do, is work one full round
adding sc all around but ensure that at the end of your round, you have
the stitch count.
OK, so turn your work in such a way that the
yoke is facing you , and you are now working your first round of the skirt on
the other side of the first foundation row.
Re-attach your yarn and I’d suggest that you attach it at the centre back so
that the joint line can be ‘hidden’ under the satin ribbon that you can thread
through the waist / chest portion of the dress.
Round 1 : 3 dc in the 1st fsc ; ch 2, 3 dc
in the next fsc ;
*ch 1, sk next 3 fsc, dc in the next fsc ;
ch 1, sk next 3 fsc, 3 dc in the next fsc ;
ch
2, 3 dc in the next fsc* ;
rep *to* till end.
Join with a sl-st to the 1st dc.
Once again, we’ll use the same Shell Stitch (or
Shell St) which is (3 dc ; ch 2, 3 dc all in the same ch-2 sp)
Round 2 : sl-st into the 1st ch-2 sp ; Shell
St in the same ch-2 sp ;
*(ch 1, sk next dc, dc in the next dc) ;
[ch 1, sk next dc, dc in the next sc] ;
ch 1, Shell st in the next ch-2 sp* ;
rep *to* till end.
Join with a sl-st to the 1st dc.
Round 3 : sl-st into the 1st ch-2 sp of the
1st Shell st ;
Shell St in the same ch-2 sp ;
*(ch 1, sk next dc, dc in the next dc) ;
[ch 1, sk next dc, dc in the next sc] ;
ch 1, Shell st in the next Shell st* ;
rep *to* till end.
Join with a sl-st to the 1st dc.
So off you go, and rep Round 3 till the skirt
portion of your dress is the length needed and return back here for the final
finishing.
You could finish off when you have the length needed, or work the
optional last round.
Optional Last Round : sc in the 1st st and in each st
and ch-sp all around. Join with a sl-st
to the 1st sc.
Fasten off and weave in all ends.
Part 3 : Neckline Finishing
I have decided to work one round of sc in each
st and ch-sp all around the neckline, just to give it a good, neat finish.
Part 4 : Armhole Finishing
The designer has worked one round of sc in each
st and ch-sp all around the armhole, and that’s one idea.
But what I’ve thought of doing is work a round
of sc , and keeping it in multiples of 10.
I’ve then worked Round 1 (of skirt).
For the next round, I’ve decided to work one sc in each st and ch-sp all
around to finish.
You could also work all 3 rounds of the skirt
portion and then do the Optional last finishing round to get a slightly longer
sleeve.
Go ahead, create.. be different!
Part 5 : Placket Finishing
The last thing that we need to work on is the
back placket. I’ve worked one row of hdc
along the right placket (where you have the holes that will allow the button to
go through). For this side, you will
work a few hdc (I worked 5 hdc between two holes) ; and then work 1 ch, sk the
next st and work hdc in the next 5 hdc.
This will give you holes that are neatly spaced apart.
Please note that before you go off to get this
side done, you need to figure out which buttons you’re using, and then ensure
that the holes that you are placing will allow the buttons through, and that
the distance between two buttons is correct for the size of the buttons.
Fasten off and weave in all ends.
Part 6 : Embellishments and Pizzazz
The last thing that we need to work on is a tiny
little flower for the top of the dress, which is of course optional. I’ve used
this free rose crochet pattern that I’ve used before.
You may also decide to add a nice satin
ribbon. You can weave in the ribbon in
the ch-sps of the last round of the yoke.
Enjoyed this ?? I sure did.. come back right
here for more freebie patterns
If you're visiting me here for the first time, and have liked the experience, do add me to your mailing list (for your convenience) , and all my future free patterns will come straight to your mail box.
I’d appreciate if you could credit my blog (and link the original pattern link) when you make your own creation. Thanks.
Have a great day and see you soon.
I have a few dresses already made, and just in case you want a dekho at those free patterns … here you go
For cute hair embellishments and motifs check the links below.
..and some belts..
and here are a few skirt patterns that you can use your belt for..
Here are some of my bolero / jacket / vest creations. Have fun with these free patterns too
Here is a list of my earlier miscellaneous home use projects. Enjoy