Saturday 4 February 2017

A DIAMOND AND A HONEYCOMB UNISEX BEANIE

free crochet pattern, diamond beanie, honeycomb beanie, crochet beanie
A DIAMOND AND A HONEYCOMB  UNISEX BEANIE 
#Blogaday  35/365

Early in the New Year, it seems like I’ve gone on a headwear binge.  I am sure you have seen my earlier blog on three pony tail caps and if you missed any of them, then do check the link right at the bottom of this blog for the messy bun caps  as well as many many more beanies and headwear.  

This diamond beanie is for my sister-in-law in her favourite colour, and as I love working with post stitch patterns, I'm gonna enjoy creating this one … so I think we’re on a winning streak here.

So after having worked on the first one (from the free pattern), I thought of a small tweak to the same pattern – and got a pretty awesome end product … again!

Thank you for joining me.

In case you have just joined me, know that you can access all of my earlier creations by checking under ‘categories’ on the right hand side of this blog under “Labels”.  Then, for your convenience, follow me here or on Facebook, You Tube, Pinterest, Twitter or Instagram.

Check out all my social media handles at the bottom of this blog

Oh, and may I add that the fastest way to find any of my blogs is via Pinterest.


All my blogs can be printed.  Find the printer friendly (green) link at the bottom of this blog.  You can also hit Control P (or Command P for Mac) on your keyboard, and the blog will go directly to the connected printer.

Remember that you only print if absolutely essential.  Save paper – Save Our Earth. 


Do remember to add my blog URL when you make and show off your creation. 

Just copy the link on the search bar above - that's the blog URL.


To purchase this or similar yarn online, click here to buy your yarns online via Amazon.  While you will still pay the same, I may get paid by Amazon as well. 

This is a free blog - so do pay it forward for me.  Cheers.


Materials used : Today I’ve used our lovely Indian Oswal Cashmilon 4-ply yarn with a 4 mm crochet hook
You also need fabric glue ; embroidery needle 

In general : Use any yarn with a suitable hook to make these projects. 
For Indians : You can use Red Rose knitting cotton or Red Rose metallic cotton as well as Vardhaman acrylic yarns

International yarns :  Among the international yarns I have used , I’d suggest Aunt Lydia Cotton 10, Aunt Lydia Bamboo-Viscose 10, DMC Petra, Sullivans knitting cotton (Australia), Milford Soft, Hilaza Rustica Eclat , Alize cotton yarn and Alize bamboo yarn.


Stitches used :
Starting slip knot : Here’s how you start with a slip knot.  https://youtu.be/lJcqsVcs8cw 

Starting slip knot 1 or the Sloppy Slip knot : This is a neat new way to start your work without a slip knot.  https://youtu.be/YfC7KmGpifs

Abbreviations used : (Using U.S terminology) 
lp(s) : Loop(s)                 sc : Single crochet
dc : Double crochet        ch : Chain
sp : Space                      sl-st : Slip stitch
 st(s) : Stitch(es)             hk : Hook
yo : Yarn Over                     
dc 2-tog : Double crochet 2-together            


Instructions : (Using U.S terminology)                                              
Please note that I start all my rows with a ch 1, turning chain for ease.
Please check the top of this blog for easy video tutorials on all stitches used in today's pattern.  For your convenience there video tutorials through the blog too
Please read through all my notes before you pick up your hook, so you know just where we're heading in our pattern.
In my patterns I work with the principle of stitch count and body measurement.  
This means that you need to work the stitch count in pattern, till you get the measurement (length and/or width) that you need for your project.  

Pattern # 1

free crochet pattern, diamond beanie, honeycomb beanie, crochet beanie

free crochet beanie pattern

For this stunning pattern, I have used the brilliant free pattern from Kristy Ashmore at http://www.ravelry.com/patterns/library/diamond-ridges


For this pattern, I’ve used our Indian Oswal Cashmilon 4-ply acrylic with a 4 mm crochet hook. 

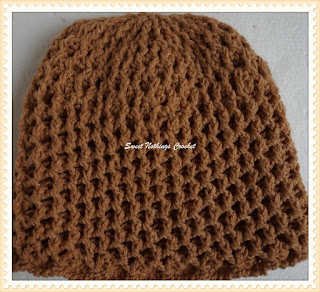
The pattern almost wholly uses front post double crochet stitches, which is what gives it that raised effect.  We start with the crown and work our way down to the base or forehead of our cap.


While I do not want to detract from the pattern painstakingly written by the designer, I would like to add a few points
a)   This is an Advanced skill pattern
b)   Cluster Stitch : This is basically a front post double crochet 2 –tog worked over two fpdc across the stitches in the middle.  So what does this mean?  To get the raised diamond pattern, we are working the fpdc 2-tog, and then we work dc in the space between two fpdc 2-tog sts.  In Round 5, we will start the creation of our first diamond, by using these fpdc 2-tog sts and this is a critical round – so do follow along with the photo tutorial given
c)     In the following rows, you just need to visualize how you’re getting your diamonds, and then work with the pattern and the part photo tutorial.

I love the effect of the raised post stitches, and in this pattern, the honeycomb effect is prominent because of the dc that we work in between two pairs of fpdc 2-tog sets.

For the final finish, I worked a round of of reverse single crochet (or crab stitch) to end up my beanie.

If you want to work the crab stitch, check https://www.youtube.com/watch?v=wE-ObvYb_Pk

Pattern # 2

free crochet beanie pattern

free crochet beanie pattern

free crochet beanie pattern

For this stunning pattern too, I have used the basic idea from the brilliant free pattern from Kristy Ashmore above.  I’ve made a slight difference in how I have used the Cluster stitch or the fpdc 2-tog.
Now usually when you work the fpdc 2-tog, you get a “V” stitch at the end, and when you need to work the 2-tog, you will work around the top of the “V”-st of two stitches that are adjacent to one another, correct?

So for this second pattern, instead of going to the top of the “V”-st , I chose to go around the two ‘legs’ / posts of the fpdc adjacent to one another.

So instead of a sharp “V” on “V”, you get this lovely honeycomb effect.  

(Check the graph under the photos)


 So with one pattern, you get a diamond effect, and with this other one you will get the honeycomb effect.

A neat 2-in-1 idea with one pattern.. neat huh?

Have fun creating something beautiful and hope the recipient loves it too.

Enjoyed this ?? I sure did.. come back right here for more freebie patterns

If you're visiting me here for the first time, and have liked the experience, do add me to your mailing list (for your convenience) , and all my future free patterns will come straight to your mail box.  
I’d appreciate if you could credit my blog (and link the original pattern link) when you make your own creation.  Thanks.

Check out my awesome pins on Pinterest at https://in.pinterest.com/shyamanivas/


Join me on YouTube at http://youtube.com/shyamanivas

And on my Facebook page at https://www.facebook.com/Sweet-Nothings-Crochet/ for more patterns.

Do follow me on Twitter https://twitter.com/ShyamaNivas


Have a great day and see you soon

Here are some of my other headwear creations.  Have fun with these patterns too