Please note that I start all my rows with a ch 1, turning chain for ease.
Please check the top of this blog for easy video tutorials on all stitches used in today's pattern. For your convenience there video tutorials through the blog too
Please read through all my notes before you pick up your hook, so you know just where we're heading in our pattern.
In my patterns I work with the principle of stitch count and body measurement. This means that you need to work the stitch count in pattern, till you get the measurement (length and/or width) that you need for your project.
Once again, let me inform you at the outset, that this pattern too is a bit wordsy (and yes, as I said before, don’t know if this is a word.. but you know what I mean by it.. so we’re good).
There are a few things that can be done differently, so if you think you have a simpler way of doing this.. do add it to the comments and or mail me, so we can make it simpler for others.
This is not my original pattern and it’s just one of those wonderful free floating freebies over the net. I am, as usual, writing down my notes, and am sharing them with you.
Quick analysis of what
we’re going to do here today.
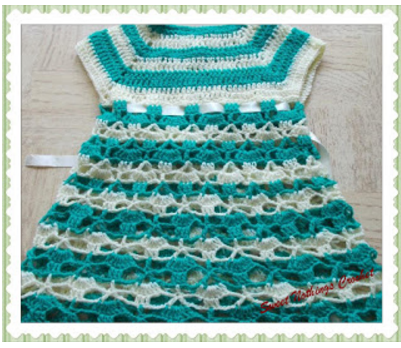
We work from the neck down (top down).
So we start from the
neck on the yoke, and work in down to the skirt portion.
For the first part of
the yoke, we will work in rows, so that we have an opening around the back,
where we can attach our buttons.
We will then join the
yoke and start working in rounds, dividing off for the armhole and then the
skirt portion.
While I am working per
chart in this pattern, I’ve tweaked it a little bit.
In the original pattern,
for the skirt section, there is a round of dc’s and picots on the
same round (i.e Round 4).. I’ve made it two rounds (i.e Rounds 4 &
5).
This is so it simplifies
it for the beginner as well.
But, you could now put it all together in
one round.
Different yarns /hook size and tension with which you work will give you a
different size. Do not worry. Just work increases of the pattern
for both yoke and skirt section and you're still going to end up with a lovely
project.
Start with
51 fsc.
Note : This is for my size. Check
the top of this blog for the link - "general neck
sizing chart" for making it to any other size.
The chart is given age-wise with the start number of
stitches.
Using the instructions below, work the pattern for the yoke
size needed for your child. (meses = months ; cadenas = stitches ; anos =
years)
(Eg : 6 a 12 meses
= 6-12 months ; Start with 58 sts ; 9 each for the back ; 12 each for the sides
and 18 across the front.
So place markers at the 9th st , then 12th st
etc all around and these become your corner sts.
Follow instructions
below accordingly)
Note that the number of stitches till your first corner may differ, but just work it till the corners, ignoring the number in between.
In our following row, let's place markers for our four
corners.
So in my case, I'll place a marker on the 7th st ;
then sk 10 sts and place in
the next st ;
then sk 15 sts and place in the next st ;
lastly sk 10 sts and
place in the next st.
Double Crochet : dc : yo, insert hk into st ; yo (3 lps on hk);
[yo, draw through 2 lps] twice. One dc made.
Chainless start for Double Crochet : I dislike the ch-2 / ch – 3 start, and this is what I do to start my row of dc.
Row 1 : dc
in 1st 6 fsc ;
[2 dc ; ch 1 , 2 dc] in next corner marked fsc
;
dc in next 10 fsc ;
rep [to]
in next corner marked fsc ;
dc in next 15 dc ;
rep [to]
in next corner marked fsc ;
dc in next 10 fsc ;
rep [to] in next corner marked fsc
;
dc in last 6 fsc. Turn.
Row 3 : (Increase
row) :
dc in 1st 10 dc ;
[2 dc , ch 1 , 2 dc] in next ch-1 sp
;
dc in next 18 dc ;
rep [to]
in next ch-1 sp ;
dc in next 23 dc ;
rep [to] in next ch-1 sp ;
dc in next 18 dc ;
rep [to]
in next ch-1 sp ;
dc in last 10 dc. Turn.
Rows 4 - 9 : Rep Row 3, and continue increasing in the same way.
Once again note that the number of stitches between corners will differ / increase with each round.
See if you’ve got a yoke length that you’re happy with, else
continue increases till you have a yoke you desire.
Remember while you are increasing length
with this pattern, you are also increasing width (shoulders will also
increase).
Once more a quick
analysis of what we’re going to do.
What we’ve made thus
far?
We have a dc section in the back, followed by a corner that has [to]
at each end.
So, we’ve increased each
side by 2 dc, using the 1st 2 dc of the [to] set.
Now in the following
row, we skip the [to] in part ; we skip the next dc section which will
"create" the armhole and jump to the next section ,
attaching the corners of the back and front yoke.
To ensure we get the
required round chest measure, we’ll work a ch 6 (which will be the under part
of the armhole).
If you are working this type of pattern for the first time, here's how you can
visualise what we're going to do.
Fold your yoke in half and you'll see a
neckline and shoulders ; the two back halves and and one front.
The lower
edge of the two sides will now create the armhole opening.
It's these two
corners that we will attach (adding ch-6 for armhole ease). Got it?
Row 10 : dc in 1st 24 dc
;
ch 6 , sk next ch-1 sp , sk next 46 dc ;
sk next ch-1 sp ; dc in next 51 dc ;
ch 6, sk next ch-1 sp , sk next 46 dc ;
sk next ch-1 sp ; dc in each dc till end. Turn.
Row 11 : dc
in 1st 24 dc ;
6 dc in the ch-6 sp ;
dc in next 51 dc ; 6 dc
in the ch-6 sp ;
dc in each dc till end. Turn.
Row 11 : dc
in each dc till end. Turn.
Two options for Row 12.
If you decide you want
to add in a satin ribbon, then instructions below.
This will give you a
neat set of holes where in you can thread your lacy ribbon.
Row
12 : dc in the 1st 2 dc ;
(ch 1, sk next dc, dc in the next dc) ;
rep (to) till last 2 dc ;
dc in the last 2 dc. Turn.
ELSE, choose Option Row 12 A.
Row
12A : dc in each dc till end. Turn.
We have completed our yoke section.
We need to work in a little button
placket.
PART 2 : BUTTON PLACKET FINISHING
I suggest we finish the placket and yoke right now.
The placket is worked along the back edge.
a) First run 2 rows of sc all the way down the side to get a
neat edge.
b) Remember the thumb rule of working 2 sc per horizontal bar
of dc.
c) Count how many stitches you are working along one side of
your placket for evenness along the other side.
d) Decide what button you are using and how many.
Check
the placement of buttons.
e) With the back facing you, and the shoulders facing upwards,
your button holes will be worked along the right hand side of your yoke
placket.
f) Depending on how large your button holes are made by
skipping stitches.
So the pattern approximately will be as
follows :
Button hole row : sc in the
1st 2 sts (from neck edge) ; *ch 2, sk next 2 sts , sc in the next 5 sts* ; rep
*to* till end.
Note : This is just an example -
the ch-2 space may be too large or too small for your button.
Please adjust
the ch-sp for your button size, and the number of stitches worked
between ch-sps depending on how far you need to space your buttons.
g) Button holes are made only
on one side. Along the other side, you will
work an sc in each st all the way down for about 4 - 5 rows,
depending on the width (diameter) of your button.
h) Before you fasten off, put your buttons into the
holes, and join the bottom of the yoke. We will work the
skirt portion in rounds.
Note : Our
stitch count for the skirt portion is 15 sts
So in your last row, do a quick stitch
count check.
Work in one round of sc to add in the required stitches to get the
stitch count right.
Even if you have more stitches, I will still suggest you add (rather
than decrease) as it is always lovely to have a fuller flare for the skirt. (i.e
: say you have 9 stitches more than needed after you calculate multiples - say
you have 69 stitches and only need 60 for multiples, I would add in 6 more to
get 75, rather than taking these 9 off . Got it? )
Round 1 : dc
in 1st dc ;
ch 4, dc in same 1st dc
;
*[sk next 2 dc , sc in
next dc ;
ch 3, sk next 2 dc, sc in next sc] ;
rep [to] 2 times ;
sk next 2 dc , (dc in
next dc ;
ch 4, dc in same dc)* ;
rep *to* till end ,
ending with [to] ;
sk next 2 dc , join with
a sl-st to the 1st dc.
Round 2 : sl-st
into the 1st ch-4 sp ;
9 dc in ch-4 sp ;
*sc in next ch-3 sp ;
[ch 3, sc in next ch-3 sp] ;
rep [to] once ;
9 dc in
ch-4 sp* ;
rep *to* till end ;
ending with [to].
Join with sl-st to the 1st st.
Round 3 : dc
in the 1st dc ;
[ch 1, dc in next dc] ;
rep [to] 7 times ;
(sc in next ch-3 sp ;
ch
3, sc in next ch-3 sp) ;
*dc in next dc ;
rep
[to] 8 times ;
rep (to) once* ;
rep *to* till end.
Join with a sl-st to the 1st st.
In our next round, we’re
going to use picots in the ch-1 sps just made.
Our picot here is (ch 3,
sl-st into the 1st ch), all in the same ch-1 sp.
How to picot : Traditionally for a ch-3 picot, you work (ch 3, sl-st in 3rd ch from hook). For a ch-5 picot, you will do (ch 5, sl-st in 5th ch from hook).
Round 4 : sl-st
into the 1st ch-1 sp ;
(sc + picot in the same ch-1
sp) ;
*[ch 1, sk next
dc, sc in next ch-1 sp ;
picot + sc in same ch-1 sp]
;
rep [to] 6 times ;
sc in
next ch-3 sp ;
sk next dc, sc in next
ch-1 sp ;
picot in same ch-1 sp* ;
rep *to* till end.
Join
with a sl-st to the 1st st.
Now this is basically
the pattern we’ll be following, but if you see the chart below, this pattern
‘moves’ – so that these four rounds now come in-between 2 sets.. so a minor
change.
We are working a layered
dress.
a) This means that all
the layers will come from ‘under’ the layer on top.
b) In this pattern, we
work a row of ch-sps that go under the earlier layer.
c) Take a look at
the pattern below, and the hook like stitch represents the ‘hooking into’ the
stitch on the line below - which is our post stitch being worked from under the
earlier row.
d) The shells in each
layer alternate such that the start of each shell is in the
middle of 2 shells from the earlier row. The shells are not worked
one below the other.
e) You will work the
pattern for the length you need for your dress.
Right.. so let’s carry on.
Round 5 : dc
in the 1st dc ;
(ch 3, sk next dc, fpdc in next dc) ;
rep (to) 3 times ;
*sk next sc, fpdc in
next dc ;
rep (to) 4 times* ;
rep *to* till end.
Join
with a sl-st to the 1st dc.
Note : In
the next round we will be repeating pattern from our first round, but with a
small change. Now let’s take a quick look at our Round 5.
We have 5 fpdc sts per
shell, and then the 1st fpdc of the next shell
without a space or stitch in between.
Now it’s in these 2 fpdc’s (i.e the
5th fpdc of one shell, and the 1st fpdc of the
next shell) that we start our new shell.
So in the (to) below,
when it says ‘same’ dc, I refer to these 2 dc as one st.
Hope this makes
sense.
The chart is a bit
‘blurry’ for this.
What you could also do
is just go into the space between the 5th fpdc and 1st fpdc so
that your shell will be bang in the centre of the earlier row shell.
Once
you get this figured, the rest of the pattern is a breeze.
Round 6 : dc
in 1st dc ,
ch 4, dc in same 1st dc
;
*sc in next ch-3 sp ;
[ch 3, sk next sc, sc in next ch-3 sp] ;
rep [to] 2 times ;
(dc
in next dc ; ch 4, dc in same dc)* ;
rep *to* till end ;
ending with [to] ;
sk next 2 dc , join with
a sl-st to the 1st dc.
Rounds 7 - 10 : Rep
Rounds 2 to 5.
With this pattern, you have the shoulders, as well as sides all
neatly finished already.
The only thing you need to work on is
the armhole opening and the neckline.
The neckline is neatly finished as
well, but if you want a contrast colour (especially if you have worked in 2
colours), then run a round of sc all around the armhole and the neckline.
I have worked a small shelled border along the armhole.
The stitch count for the shelled
armhole border is in multiples
of 5
Border Shell round :
sc in the 1st st ;
*sk next 2 sc, 5 dc in the next sc ;
sk
next 2 sc, sc in the next sc* ;
rep *to* all around
and join with
a sl-st to the 1st st.
Fasten off and weave in ends.
Alternate border edging : Instead of a shelled finish, you can
end with a picot edging.
Border
picot round :
sc in the 1st 2 st ;
*sc + picot in the next st ; sc in the next 4 sts* ;
rep *to* all around and join with
a sl-st to the 1st st.
Fasten off and weave in ends.
Enjoyed this ?? I sure did.. Come
back right here for more freebie patterns