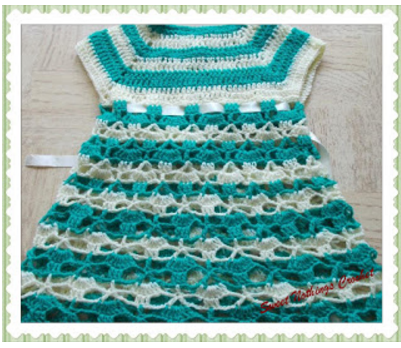
Instructions : (Using
U.S terminology)
This is not my original pattern and it’s just
one of those wonderful free floating freebies over the net.
These are my original notes, that I am sharing them with you as I make my own project.
You can make this pattern to any size, using any yarn with a suitable
hook.
As always, I request you to please read through
all the instructions and links before you pick up your hook.
As mentioned at the start, you can make this
dress to any size, using any yarn and suitable hook.
Just ensure
that you get the stitch count right for the measure needed for
your child.
This dress is worked top down.
We start with the yoke and work down to
the skirt portion of our dress.
Given at the top of this blog are neck sizing
charts and yoke sizing as well.
While I am working this for the size
specified above, you can use the charts and sizes given there to adapt it to
the size you want.
PART 1 : YOKE
We will start working in rows for part (or whole)
of the yoke so that we get a small button placket around the back.
I
usually suggest that you work a longer button placket opening (all down
the yoke, or till waist) for younger children, for ease.
That said,
you can decide to have a smaller opening.
If you so decide, join at the
end of the row you think is sufficient for the placket opening, and continue
working the pattern in rounds.
The stitch count for today's yoke is in multiples of 5 + 2
Start : with fsc in multiples of 5 + 2 for round neck of child.
I started with 97 fsc for my 12-month old
In the following row we will work a decorative stitch using the dc 2-tog.
Please check the top of this blog for a how to if needed.
Please note that this is a decorative stitch and not a
decrease.
We will, therefore work both "legs" of our dc 2-tog in the
same st, and not in 2 adjoining stitches.
So you will get a plump
bobble-like stitch that gives us the decorative effect.
Got it?
Row 1 : dc in the 1st fsc ;
*ch 2, sk next fsc, sc in next fsc ;
ch 2, sk next fsc, dc 2-tog
in the next fsc* ;
rep *to* till last 2 fsc,
and dc in that last fsc (instead of a dc-2 tog). Turn.
Row 2 : dc in 1st dc ;
*ch 5, sk next sc, sc in next
dc-2 tog* ;
rep *to* till end ;
dc in the last dc. Turn.
We’ll now give our cute neckline a shape, so let’s mark off our
four ‘corners’.
So with our opening around the back, place your 1st marker
in the 4th ch-5 sp ;
sk three ch-5 sps and place 2nd marker in the next
ch-5 sp ;
sk seven ch-5 sps and place 3rd marker in the next
ch-5 sp ;
sk three ch-5 sps and place last marker in ch-5 sp ;
and you should have four ch-5 sps left till end.
Row 3 : dc in the 1st dc ;
*{ch 2, dc 2-tog in the next sc ; ch 2, sc in next ch-5 sp}
;
rep {to} till 1st marker ;
(dc-2 tog ; ch 2, dc-2 tog ; ch 2, dc-2 tog) all in the next sc* ;
rep *to* till end ;
dc in that last dc. Turn.
Row 4 : dc in 1st dc ;
{ch 5, sk next sc, sc in next
dc-2 tog} ;
rep {to} 2 times ;
(ch 5, sc in next dc 2 tog ;
ch 5, sc in next dc 2-tog ;
ch 5, sc
in next dc 2-tog) all in that 1st marked set of 2 dc 2-togs
;
rep {to} 3 times ;
rep (to) once till the 2nd marker ;
rep {to} 7 times ;
rep (to) once till the 3rd marker ;
rep {to} 3 times ;
rep (to) once till the last marker ;
rep {to} till end ; dc in the last dc. Turn.
Right, so we’ve got our four ‘corners’, and we have our three dc
2-tog sets marking each corner.
Now, with we’re going to work a few rows of repeats – (repeating rows 3 &
4) – so let’s see what we’re going to repeat.
The corner three dc 2-tog set : The
middle dc 2-tog is the one that is the perfect corner.
So all increases (ie in the next row – Row 5, when you increase),
are done in that stitch.
There will be a neat seam that forms along that end shortly.
OK.. so let’s go ahead and rep Rows 3 & 4 four times,
(ensuring that our repeats are just in that middle dc 2-tog), or till we have
this yoke that is about 3.5” long.
We will then shape off the armholes and continue to increase
the yoke a little more.
So once again, let’s mark off our corners.
This time, our ‘corner’ is the centre dc 2-tog of the three dc
2-tog sets in each section.
So what we are going to do is go from the back till the first
marker, and then skip across to the next marker, we will then go around to all
the front till the 3rd marker, and skip across to the last
marker – and finally complete the last bit of our yoke back.
After this row, our work will proceed in rounds.
The little opening at the back will be the button placket.
Before you proceed with the skirt, do fasten off the shoulders and
do the little placket for the button as well, and we'll then work in rounds for
the skirt.
Round 13 : sc in 1st dc ;
*ch 5, sk next sc, sc in next dc-2 tog* ;
rep *to* till end ;
sc in the last dc. Join with a sl-st to the 1st sc.
Remember that in each corner, we’re going to work sc in the 1st dc
2-tog (there are three dc-2 togs in each corner), and then ch 5 and sc in the
next dc 2-tog, we will then sk that last dc 2-tog of the 1st corner,
and the first dc 2-tog of the next corner, and then use the
next two dc 2-togs of that corner.
This we will repeat both sides of our yoke and then join at the
end.
For convenience, we will
restart round counts for the skirt
PART 2 : SKIRT
From here one we’ll be “V”-st which is (2
dc ; ch 1, 2 dc) all in the same st or ch-sp.
Let me give you a few ideas to increase the flare of your dress,
especially if you are making this dress for an older child and are going to
have a longer skirt portion.
The options are
a) After a few rows, you could decide to add in a few dc into the
"V"-st, so you could make it (3 dc ; ch 1, 3 dc) ; and then later on add in another dc
(i.e (4 dc ; ch 2, 4 dc)
b) You could decide to increase the ch-spacing in the
"V"-st when you add a dc in.
Remember that if you are going to
increase dc, add them in a step at a time for continuity - so 3 dc before 4 dc.
Round 1 : “V”-st in the 1st sc ; sc in the next ch-5 sp ;
*“V”-st in the next sc ;
sc in the next ch-5 sp* ;
rep *to* till end.
Join with a sl-st to the 1st dc.
Round 2 : sl-st
into the 1st “V”-st ;
“V”-st in that 1st “V”-st
; ch 1 ,
*“V”-st in the next
“V”-st* ;
rep *to* till end.
Join with a sl-st to the 1st dc.
Round 3 : sl-st
into the 1st “V”-st ;
“V”-st in that 1st “V”-st ; ch 2 ,
*“V”-st in the next “V”-st* ;
rep *to* till end.
Join with a sl-st to the 1st dc.
Round 4 : sl-st
into the 1st “V”-st ;
“V”-st in that 1st “V”-st ; ch 3 ,
*“V”-st in the next
“V”-st* ;
rep *to* till end.
Join with a sl-st to the 1st dc.
Round 5 : Rep
Round 4
Round 6 : sl-st
into the 1st “V”-st ;
*“V”-st in the “V”-st ;
ch 3 , 8 dc in next ch-1 sp (of next “V”-st) ; ch 3,* ;
rep *to* till end.
Join with a sl-st to the 1st dc.
Round 7 : sl-st
into the 1st “V”-st ;
*“V”-st in the “V”-st ;
ch 3 ,
dc in the next dc, (ch 1 , dc in the next dc) ;
rep (to) 6 times ; ch
3,* ;
rep *to* till end.
Join with a sl-st to the 1st dc.
Round 8 : sl-st
into the 1st “V”-st ;
*“V”-st in the “V”-st ;
ch 3 , sk 1st ch-3 sp and dc ; sc in the next ch-1 sp
;
(ch 3 , sc in the next
ch-1 sp) ;
rep (to) 5 times ; ch 3,* ;
rep *to* till end.
Join with a sl-st to the 1st dc.
Round 9 : sl-st
into the 1st “V”-st ;
*“V”-st in the “V”-st ;
ch 3 , sk 1st ch-3 sp ; sc in the next ch-3 sp ;
(ch 3 , sc in the next
ch-3 sp) ;
rep (to) 4 times ; ch 3,* ;
rep *to* till end.
Join with a sl-st to the 1st dc.
Round 10 : sl-st
into the 1st “V”-st ;
*[2 dc ; ch 2, 2 dc ; ch
2, 2 dc] in the “V”-st ;
ch 3 , sk 1st ch-3 sp ;
(sc in the next ch-3 sp
; ch 3 , sc in the next ch-3 sp) ;
rep (to) 3 times ; ch 3,* ;
rep *to* till end.
Join with a sl-st to the 1st dc.
Round 11 : sl-st
into the 1st ch-2 sp ;
*[“V”-st in ch-2 sp ; ch
2, “V”-st in next ch-2 sp] ;
ch 3 , sk 1st ch-3 sp ; sc
in the next ch-3 sp ;
(ch 3 , sc in the next
ch-3 sp) ;
rep (to) 2 times ; ch 3,* ;
rep *to* till end.
Join with a sl-st to the 1st dc.
Round 12 : sl-st
into the 1st ch-2 sp ;
*[“V”-st in ch-2 sp ; ch
3, “V”-st in next ch-2 sp] ;
ch 3 , sk 1st ch-3 sp ; sc
in the next ch-3 sp ;
(ch 3 , sc in the next
ch-3 sp) ;
rep (to) once ; ch 3,* ;
rep *to* till end.
Join with a sl-st to the 1st dc.
Round 13 : sl-st into the 1st “V”-st ;
*[“V”-st in “V”-st ;
ch
2, “V”-st in next ch-3 sp ;
ch 2, “V”-st in next “V”-st] ;
ch 3 , sk 1st ch-3
sp ;
(sc in the next ch-3 sp ; ch 3 , sc in the next ch-3 sp) ; ch 3,* ;
rep *to* till end.
Join with a sl-st to the 1st dc.
Round 14 : sl-st
into the 1st “V”-st ;
*[“V”-st in “V”-st ;
ch
3, (2 dc, ch 4, 2 dc) in next “V”-st ; ch 3, “V”-st in next “V”-st] ;
ch 3 , sk 1st ch-3
sp ; sc in the next ch-3 sp ; ch 3,* ;
rep *to* till end.
Join with a sl-st to the 1st dc.
Round 15 : sl-st
into the 1st “V”-st ;
*“V”-st in “V”-st ;
ch
3, 8 dc in next ch-4 sp ; ch 3, “V”-st in next “V”-st ;
ch 3 , sk 1st ch-3
sp ; sc in the next ch-3 sp ;
ch 3, sk next sc,* ;
rep *to* till end.
Join with a sl-st to the 1st dc.
Round 16 : sl-st
into the 1st “V”-st ;
*2 dc in “V”-st ;
ch 3,
dc in next dc ; (ch 1, dc in next dc) ;
rep (to) 6 times ;
ch 3, 2 dc in next
“V”-st ;
ch 1, sk ch-3 sp* ;
rep *to* till end.
Join with a sl-st to the 1st dc.
Note : Now
we need to be in the ch-1 sp just behind us.. so we could work
this in two ways.. you could either sl-st all the way forward into the dc and
start the pineapples, or do it my way :
which is to TURN,
sl-st into that ch-1 sp ;
then TURN again (so we’re once again
facing the way we want to be),
and work the 1st “V”-st right here
in this ch-sp.
Assuming you’re opting
for ‘my way’, I’m writing the pattern down accordingly
Round 17 : sl-st
into the ch-1 sp ;
*“V”-st in the ch-1 sp ;
ch 3, sk next ch-3 sp and dc , sc in next ch-1 sp ;
(ch 3, sc in next ch-1
sp) ;
rep (to) 5 times ; ch 3,* ;
rep *to* till end.
Join with a sl-st to the 1st dc.
Round 18 : sl-st
into the 1st “V”-st ;
*[2 dc ; ch 2, 2 dc] in
the “V”-st ;
ch 3, sk next ch-3 sp , sc in next ch-3 sp ;
(ch 3, sc in next ch-3
sp) ;
rep (to) 4 times ; ch 3,* ;
rep *to* till end.
Join with a sl-st to the 1st dc.
Round 19 : sl-st
into the 1st ch-2 sp ;
*[2 dc ; ch 2, 2 dc ; ch
2, 2 dc] all in the ch-2 sp ;
ch 3, sk next ch-3 sp, sc in next ch-3 sp ;
(ch 3, sc in next ch-3
sp) ;
rep (to) 3 times; ch 3,* ;
rep *to* till end.
Join with a sl-st to the 1st dc.
Round 20 : sl-st
into the 1st ch-2 sp ;
*“V”-st in ch-2 sp ;
ch
2, “V”-st in next ch-2 sp ;
ch 3, sk next ch-3 sp, sc in next ch-3 sp ;
(ch 3, sc in next ch-3
sp) ;
rep (to) 2 times; ch 3,* ;
rep *to* till end.
Join with a sl-st to the 1st dc.
Round 21 : sl-st
into the 1st “V”-st ;
*“V”-st in “V”-st ;
ch
3, “V”-st in next “V”-st ;
ch 3, sk next ch-3 sp, sc in next ch-3 sp ;
(ch 3, sc in next ch-3
sp) ;
rep (to) once ; ch 3,* ;
rep *to* till end.
Join with a sl-st to the 1st dc.
Round 22 : sl-st
into the 1st “V”-st ;
*“V”-st in “V”-st ; ch
2, “V”-st in next ch-3 sp ; ch 2, “V”-st in next “V”-st ;
ch 3, sk next ch-3 sp,
sc in next ch-3 sp ; (ch 3, sc in next ch-3 sp) ; ch 3,* ;
rep *to* till end.
Join with a sl-st to the 1st dc.
Round 23 : sl-st
into the 1st “V”-st ;
*“V”-st in “V”-st ;
ch
2, [2 dc ; ch 4, 2 dc] in next “V”-st ;
ch 2, “V”-st in next “V”-st ;
ch 3, sk next ch-3 sp,
sc in next ch-3 sp ; ch 3,* ;
rep *to* till end.
Join with a sl-st to the 1st dc.
Round 24 : sl-st
into the 1st “V”-st ;
*“V”-st in “V”-st ;
ch
3, 8 dc in next ch-4 sp ;
ch 3, “V”-st in next
“V”-st ;
ch 3, sk next sc* ;
rep *to* till end.
Join with a sl-st to the 1st dc.
Round 25 : sl-st
into the 1st “V”-st ;
*“V”-st in “V”-st ;
ch
3, dc in next dc ; (ch 1, dc in next dc) ;
rep (to) 6 times ;
ch 3,
“V”-st in next “V”-st ; ch 1,* ;
rep *to* till end.
Join with a sl-st to the 1st dc.
Round 25 : sl-st
into the 1st “V”-st ;
*2 dc in “V”-st ;
ch 3,
sk next dc , dc 3-tog in next ch-1 sp ;
(ch 3, dc 3-tog in next
ch-1 sp) ;
rep (to) 5 times ;
ch 3, 2 dc in next “V”-st ; ch 1,* ;
rep *to* till end.
Join with a sl-st to the 1st dc.
Fasten off. Weave
in ends.